Inputs Tab and Settings
You can choose the inputs for training — the training input(s), output(s), and masks — as well as the data augmentation and validation settings on the Inputs tab.
Click the Inputs tab on the Model Training panel to go to the Inputs tab, shown below.
Inputs tab

A. Training Data B. Data Augmentation Settings C. Validation Settings D. Visual Feedback
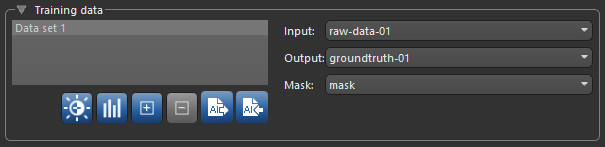
You can choose the training input(s), an output, and a mask for defining the model working space in the Training Data box, shown below.
Training Data
| Description | |
|---|---|
| Training data list |
Lists all of the selected training sets, which include inputs, outputs, and masks. Options in the Training Data list include the following:
Edit Calibration… Click the Edit Calibration Show Training Data Statistics… Click the Show Statistics
Note This option is NOT available for regression models. Add New Training Set… Click the Add New Remove New Training Set… Click the Remove Export as AI… Click the Export as AI Import as AI… Click the Import as AI |
| Input |
Lets you select the training input(s). In simple cases, you will only have to choose a single input, as shown below.
Note You can also choose to multiple inputs for the training input. |
| Output |
Lets you select a target output for training. You should note that outputs are dependent on the type of model that will be trained and must be same size and shape as the input data for training semantic segmentation and denoising models. Outputs for super-resolution can be a factor — 2, 4, or 8 times — of the input X-Y dimension.
If you are training a model for continuous output, for example with an autoencoder for denoising or super-resolution, you have to select an image channel as the output. If you are training a model for semantic segmentation, you will need to select a multi-ROI with the same number of classes as the model's 'class count' (see Model Generator and Deep Learning Architectures). |
| Mask | Lets you select a mask to define the working space for the model, which can help reduce training times and increase training accuracy. You should note that masks should be large enough to enclose the input (patch) size and that rectangular shapes are often best. See Applying Masks for additional information about mask requirements. |
 button to open the Training Data Statistics dialog, shown below. The dialog, which is available for segmentation models only, lists the total number of voxels in the training set(s) added to the model, the percentage of labeled training voxels, and the percentage of labeled voxels associated with each class. Cumulative statistics for all training data are also presented. You should note that all statistics are computed within selected masks.
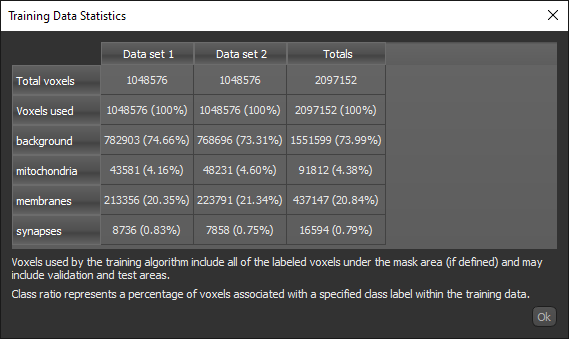

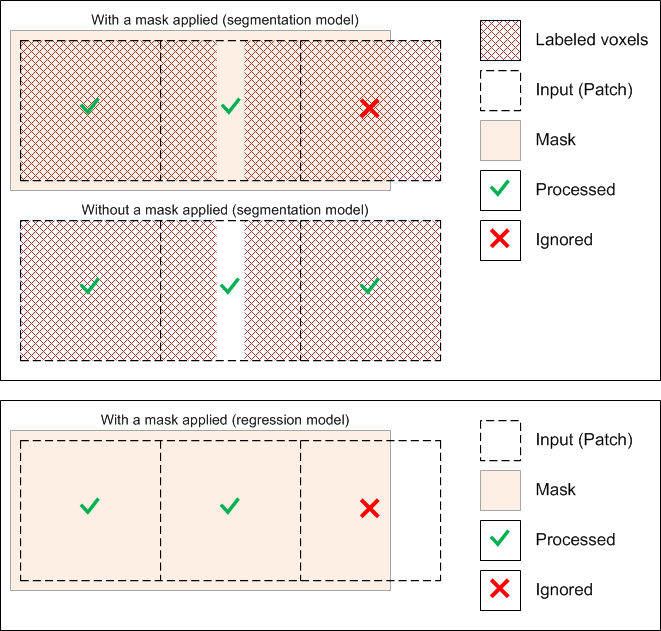
Masks let you define the working space for the model, which can help reduce training times and increase training accuracy. You should note that masks should be large enough to enclose the input (patch) size and that rectangular shapes are often best.
The starting point of the input (patch) grid is calculated from the minimum (0,0) of each connected component in the mask. You should note that for both segmentation and regression models, input (patches) that do not correspond 100% with the applied mask will be ignored during training, as shown below.
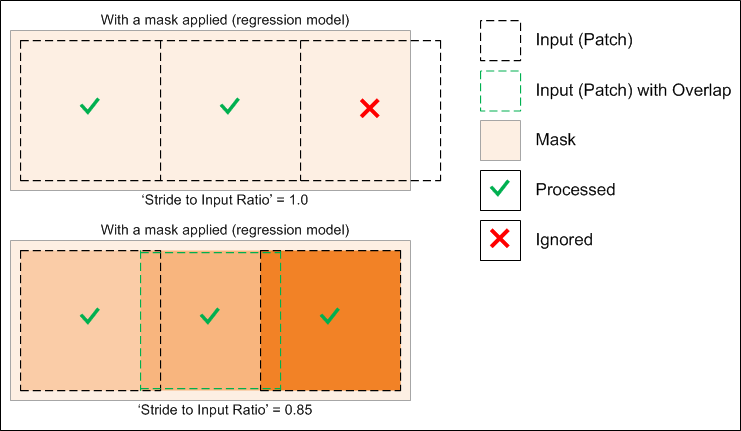
Note The selected 'Stride to Input Ratio' may affect which patches are processed. At a setting of '1.0', patches will be extracted sequentially one after another without any overlap, while at a setting less than '1.0', overlaps will be created between data patches (see Basic Settings for more information about this training parameter).
The performance of neural networks often improves with the amount of data available, particularly the ability of the fit models to generalize what they have learned to new images.
A common way to compensate small training sets is to use data augmentation. If selected, different transformations will be applied to simulate more data than is actually available. Images may be flipped vertically or horizontally, rotated, sheared, or scaled. As such, specific data augmentation options should be chosen within the context of the training dataset and knowledge of the problem domain. In addition, you should consider experimenting with the different data augmentation methods to see which ones result in a measurable improvement to model performance, perhaps with a small dataset, model, and training run.
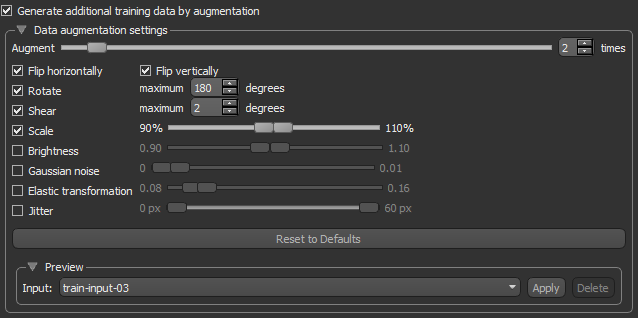
Check the Generate additional training data by augmentation option to activate the Data Augmentation settings, shown below.
Data Augmentation settings
| Description | |
|---|---|
| Augment | Lets you choose how many times each data patch is augmented during a single training epoch. You should note that at a setting of '1', the amount of training data will be doubled, at a setting of '2', the training data will be tripled, and so on. |
| Flip horizontally | Flips data patches horizontally by reversing the columns of pixels. |
| Flip vertically | Flips data patches vertically by reversing the rows of pixels. |
| Rotate |
Randomly rotates data patches clockwise by a given number of degrees from 0 to the set maximum.
Maximum degrees… Lets you set the maximum number of degrees in the rotation. The maximum number of degrees that the data can be rotated is 180. |
| Shear |
Randomly shears data patches clockwise by a given number of degrees from 0 to the set maximum.
Maximum degrees… Lets you set the maximum number of degrees to shear images. The maximum number of degrees that the data can be sheared is 45. |
| Scale |
Randomly scales the image within a specified range. For example, between 70% (zoom in) and 130% (zoom out).
Note Values less than 100% will scale the image in. For example, a setting of 50% will make the objects in the image 50% larger. Values larger than 100% will zoom the image out, making objects smaller. Scaling at 100% will have no effect. |
| Brightness | Randomly darkens images within a specified range, for example between 0.2 or 20% and 1.0 (no change). In this case, the intent is to allow a model to generalize across images trained on different illumination levels. |
| Gaussian noise | Randomly adds Gaussian noise, within a specified range, to the image. |
| Elastic transformation |
Randomly adds an elastic transformation, within a specified range, to the image.
Note Computing elastic transformations is computationally expensive and selecting this option will likely increase training times significantly. |
| Jitter | Randomly applies a 'jitter' effect input and output patches within the set range. You should note that in many cases jitter can help prevent overfitting during training. |
| Reset to Defaults | Click the Reset to Defaults button to revert to the original data augmentation settings. |
| Preview |
Lets you preview the effect of data augmentation on a selected training data input.
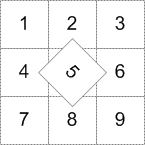
Input… Choose the dataset that will provide the preview in the Input drop-down menu. You should note that the dataset must be visible in the selected view to compute a preview. Apply… Click to compute the preview. Delete… Click to delete the preview. When deleted, the preview will be removed from the view and the Data Properties and Settings panel. Note The original patch size is always maintained when transformations are applied, as shown in the example below for the rotation of patch 5. In this case, some data from patches 2, 4, 6, and 8 will be added to patch 5.
For border patches, the original image will be padded with extra rows and columns, as required. For example, column[-1] = column [1], column [-2] = column [2], and so on. |
In most cases, you should use validation to evaluate how your network is performing during training. Models trained without validation usually do not generalize well due to overfitting and some callbacks may only work when there is validation data. Whenever you use validation, you can either randomly split the available training data into training and validation sets by specifying a percentage of the data to be preserved for validation, or you can provide separate validation data.
While 'training data' is used in the process of updating the layer weights, 'validation data' is only used during the training to evaluate how the network would perform on data it hasn't been directly trained on. If the training is going well, every iteration updates the weights of the network so it becomes better and better at predicting on the training data. However, there's a danger that the network becomes too good at predicting on the training data by learning very specific features of the training set, rather than generally useful features which would be helpful for predicting on new data. This is called 'overfitting'. Validation checks for this. If you see the validation accuracy start to drop substantially as you train further, that would be evidence of overfitting.
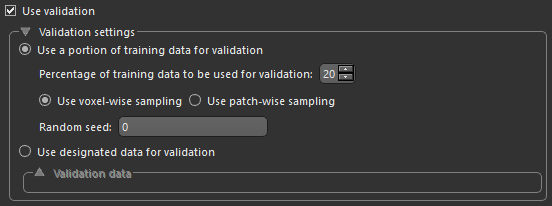
Check the Use validation option to activate the Validation settings, shown below.
Validation settings
| Description | |
|---|---|
| Use a portion of training data for validation | If selected, lets you automatically split the training data into training and validation sets.
Percentage of training data to be used for validation… Lets you choose the percentage of the training data that will be used for validation. Use voxel-wise sampling or Use patch-wise sampling… These settings, which are only available for semantic segmentation models, determine how sampling is done. You should note that in the case of voxel-wise sampling, patches will contain voxels designated as training, validation, and test, while in the case of patch-wise sampling, voxels in the sampled patches will be exclusively for training, validation, or test. You should also note that in either case, the maximum number of patches will be extracted from the training set, regardless of whether you decided to employ a sparse or dense labeling strategy. As shown in the example below, training, validation, and test masks were generated using voxel-wise sampling (on the left) and using patch-wise sampling (on the right). You should note that training masks are shown in blue, validation masks are shown in yellow, and test masks are shown in orange.
|
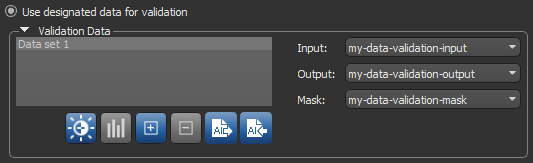
| Use designated data for validation |
Lets you choose separate data for validation, as shown below.
Note You can use the same data for both training and validation provided that you apply non-intersecting masks. |

Lets you designate a 2D rectangular region for monitoring and evaluating the progress of training deep models. With visual feedback enabled, the model’s inference will be displayed in the Training dialog in real time as each epoch is completed (see Enabling Visual Feedback).
Visual feedback

